
HOW EASY-TIMESHARE WORKS
Overview
The system you have received from us has been fully configured with appropriate hardware and software, meaning that all you have to do is plug in cables into the back of the system and turn on the machine.
System Setup
The following are the connectors you will find on the back panel of the system (top-down order):
In addition to the above connections you will need to plug in the keyboard and the mouse into the back of you system and, of course, the power cords.
Next, power the system on.
After the system boots you will see the following screen:

At this point you can double click on the EasyCo Time-Share Gateway icon which will auto dial your internet connection and then auto start the EasyCo Time-Share Gateway. The following window will appear on your screen:
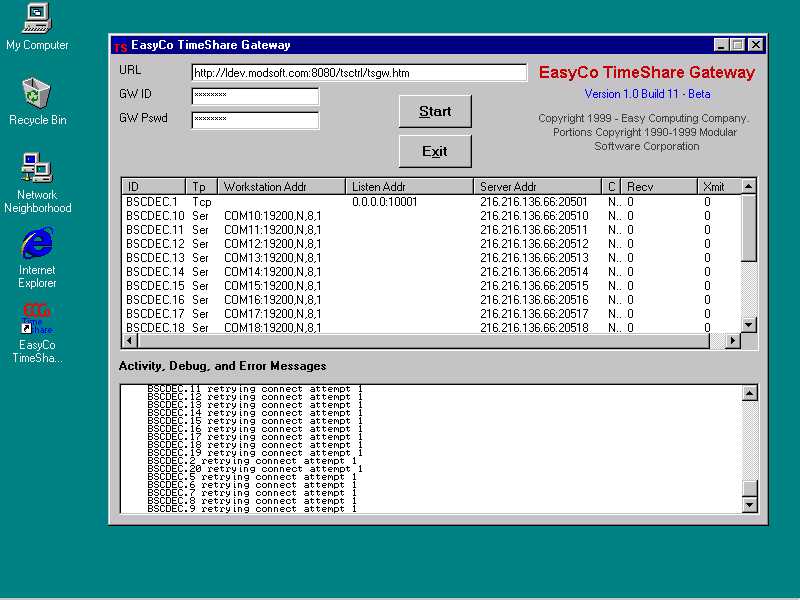
The top part of the Easy-Time gateway consist of the URL location, GW ID, and GW password which will be provided by EasyCo.
The middle section provides information about the status of the connections on your system. The Tp column displays the type of a specific connection (Serial or TCP). Workstation Addr column displays the configuration details for Serial Ports. Listen Addr column displays information about TCP ports. The C column displays if the connection to a certain serial or TCP port has been established (Yes/No). Finally, the Recv and Xmit columns display packet (data) receive and transmit information for the certain Serial or TCP port.
The lower section provides activity, debug, and error messages.
Use
Once installed, Easy-TimeShare works automatically to establish and hold your Internet connection to our server. Typically, this runs through the following steps:
You are now connected and can begin using the service.
If you lose the connection for any reason, Easy-TimeShare automatically tries to reestablish the link. In general, other than a possible slight delay, you will not even notice this reconnection delay.
And if the link cannot be completely established, the client at your end will go into diagnostic mode, attempting to tell you what is broken. This begins with modem and connection validation, followed by the component parts of our server. This intelligence saves a lot of service work by telling service technicians where to look for a problem.